Frequently Asked Questions
You will find quick answers to some of our more common questions below, but please stop by our knowledgebase for more in-depth information and tutorials.
Purchase FAQ
You can purchase directly through our webstore using a credit card, or you can send a check or bank transfer.
Note that your payment must clear our account before we can release license details. Checks can take several weeks to clear, and bank transfers can take a few more days than your chosen delivery method implies.
CHECKS:
Make checks payable to:
COGNIVIEW LLC
c/o Lior Weinstein
1007 Mansell Rd
Suite A #520
Roswell, GA 30076
USA
(Payable to COGNIVIEW LLC)
***************
BANK TRANSFER:
Different currencies require different information, so these details can vary. Please ask for transfer details for your particular purchase.
**All fees are the responsibility of the customer.
We do not incur fees on our end to receive a bank transfer, so any amount deducted for fees will need to be paid before we can release license information. Please ensure your invoice is paid in full or be ready to use a credit card for quick payment of the unpaid amount so we can take care of your order as quickly as possible.
Absolutely!
You can see a list of our official resellers here: https://pdf2xl.com/partners/
PDF2XL is a subscription service. You can choose whether to pay for a monthly or yearly subscription and purchase as many seats as you need on that plan. See our pricing plans here.
*Note that subscriptions auto-renew unless you cancel before your term restarts. We are unable to provide refunds for failure to terminate your subscription on time.
If you are looking for a perpetual option, we do offer PDF2XL Pro, which has all the features of the Business plan, but provides updates and support for the first year only. If you require ongoing maintenance, please purchase the Business plan.
Please note that a perpetual (aka “lifetime”) license allows you to continue using the software version you purchased without further cost until it becomes unstable.
Depending on OS updates, this can be for several years or possibly less and cannot be predicted.
It is not a guarantee of use for the duration of the user’s lifetime.
While you can cancel your subscription at any time during your term, it will not result in a refund. For example, if you have a monthly subscription and cancel after a two-week period, your subscription will remain active until your term is completed, but will not automatically renew.
Since PDF2XL is a subscription that you can cancel at any time, all sales are final.
To ensure that PDF2XL is the right fit for you, we provide a free trial version without any time limitation, so you can thoroughly test it before you purchase a subscription.
If you wish to avoid charges for renewal of this subscription, please be sure to cancel before your term ends. We are unable to provide refunds for failure to terminate your subscription on time. This can be done via your customer portal: https://pdf2xl.com/app/#/auth/login
A few minutes after your purchase is processed, we send an e-mail to the address you provided. This message contains the instructions for downloading, installing, and activating the software. PDF2XL7 and later uses an email address/password activation process.
If you did not receive the notification e-mail within the hour, there could have been a problem with our automatic mail sending service, the e-mail address you provided, or the mail could have been marked as junk and discarded.
Check the junk mail folder in your e-mail application to see if your email is in there.
If you cannot find the notification message, please contact us at support@pdf2xl.com with the purchase information. If possible, provide us with a different e-mail address to use. We will get back to you with the download and activation instructions as soon as possible.
The option to purchase a backup CD is available during the checkout process. When you order a CD, you will be able to download and activate the Full version right away, and the CD will get to you by snail-mail.
Important: CD purchases are sent from a third party and are completely optional. When you choose to purchase a CD, you are accepting that we cannot provide a refund.
If you are using the Home edition, you can install on two computers, but you cannot use them both at the same time. Attempting to run two PDF2XL installs from a single license will cause an error. If you are using them separately there should be no issues.
Note that if more than one person is to use the application, each person will need a license of their own.
For our Business and Enterprise customers, you will need a license for each computer the software is being installed on.
Upgrades can be applied to your plan through your user dashboard.
Just access the “Upgrade your Plan” section and click the “Change Subscription” button under Active Subscriptions. The system will automatically prorate your bill and charge your credit card based on what you’ve already paid It’s not possible to downgrade a plan directly. You can cancel your current plan, which will still be active for you until the end of your term, and then you can resubscribe with a lesser plan.
PDF2XL General FAQ
Version 7.0 of PDF2XL introduced the ability to convert without having Excel installed on your computer.
If you are using one of our obsolete versions (6.5 and lower), Excel is needed to convert into an excel format. If you don’t have Excel, you can alternatively convert to CSV or HTML.
Unfortunately, our desktop application does not work natively on a Mac. We do, however, work great in virtualized environments like VMWare, Parallels, etc.
If you have Windows and Office installed in a virtual environment on your Mac, you can install PDF2XL and run it like you would normally.
You won’t be able to export directly into QuickBooks, but you can set up your output for easy import.
Prepare your layout, make sure the columns are formatted to the proper order that you require for QuickBooks, then export to CSV. Once it’s in CSV format, you can simply import into your QuickBooks application.
Some PDF files are protected by the author so that their contents cannot be copied or extracted.
Adobe Systems Inc®—the company that created and maintains the PDF format—requires that all applications honor this special limitation. When you open such a PDF file, PDF2XL will let you know this by displaying the following notification:
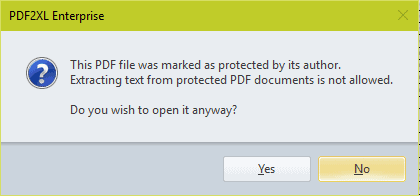
If you click on Yes, the file will be opened but you will not be able to extract any data from it in any of the available formats.
More information about this feature of Adobe Acrobat and PDF files is available on the Adobe website
There are 4 possible explanations:
- There is no opened file – please use the ‘open’ button to open a file.
- No data was selected – please select the data you want to convert.
- (Older versions) You are in ‘text selection’ mode – change to ‘layout selection’ mode (Edit→ Layout selection mode).
- You are in ‘OCR validation’ mode – you need to close the data validation window in order to complete the conversion.
OPERATING SYSTEM: Server 2012 R2+, Windows 7 SP1+, Windows 8, Windows 10, Windows 11
*Note that x64 operating systems are fully supported but printing into the CogniView printer in ia64 (Itanium) is not.
PROCESSOR: 1.5GHz or faster multi-core processor
*Use of Advanced OCR requires a 2012 or later processor with support for AVX instructions
MEMORY: Windows 98, Windows ME (64MB), Windows 2000, Windows Server 2003 (128MB-256MB), Windows Vista, Windows Server 2008, Windows 7 (512MB-1GB), Windows Server 2008 R2 (768MB-1GB)
FREE DISK SPACE: 250MB – 35MB
SCREEN RESOLUTION: 800 x 600px – 1024 x 768px
Microsoft Word™ and Excel™ 1: Office 97 – Office 2000, 2003, 2007, 2010
Native PDF (not scanned) – Most likely the font in the PDF file is embedded. Embedded fonts cannot be perfectly extracted. To verify the font is embedded, open the PDF with Acrobat Reader, copy some text and paste it into another application such as Word or Notepad. If the text is not recognized, the font is embedded. To work around this problem please select ‘OCR’ from the view menu to force the OCR recognition.
Scanned PDF – The OCR Engine is sensitive to poor quality scans. In order to improve the OCR recognition quality you can either:
- Rescan your document in higher resolution.
- Try to remove any hand written text, watermarks, etc.
- Try to change the OCR advanced settings to achieve better results by going to Start->Options->OCR. You can read more about it here: User Interface Dialogs Options OCR .
- If any of the columns have a specific format (Number, date etc.) you can set the column format in advance by right clicking the columns and choosing the correct format from “Column Format in Output”. You can read more about it here: Concepts-Conversion Formats.
There are two ways to perform a multiple-page conversion in PDF2XL. Choosing either one depends on the location of the table inside the pages:
- If the table appears in the same location on every page, you need only create a layout for the first page with the “All Pages Same” option selected. Make sure you select the correct Page Range before you convert.
- If the table is not in the same location on every page, you can follow the steps above to create the layout, but then you’ll need to select the “Pages Different” option so that you can adjust where the table appears on each page. There are a few different ways to do this. You can learn about them here.
Currently you can only perform OCR on PDF files you open with PDF2XL Enterprise.
When you mark a table, PDF2XL detects the location of rows automatically. Sometimes PDF2XL splits a single table row into more than one row; this usually happens when a table row has more than one text line.
If this happens, you can adjust where the row lines are located instead of relying on the automatic detection.
If you are using an older version of PDF2XL, please consider updating, as problems like this often occur when your software begins showing signs of compatibility and we can no longer support obsolete versions of PDF2XL.
If you are using a current version, try enabling the OCR or manually adding your column dividers.
First, make sure you’ve applied a layout, which should include at least one table. You can tell the difference between tables and fields, since tables are marked in orange and fields are light blue. If you have no orange boxes, right-click on a field and select “Change to Table”.
If you’ve applied a layout and are still getting this error, try enabling your OCR.
The batch conversion process in the Business and Enterprise plans cannot work unless you select the files manually, however, if you are converting many files at once, you can select them all at the same time:
- From the Batch Conversion prompt, click “Add Files”
- Locate the folder you are trying to convert, then hit CTRL + A to select all the files
- Click “Open” to add them all to the Batch Conversion prompt, and then select your layout
Remember that you can only convert ‘like” documents at once as they all need to use a single layout.
Product Activation FAQ
The activation process is performed after the Full version of the product is installed, and before you can use it. Its purpose is to make sure that no one else uses the license you have purchased.
The activation is a one-time process; that is, after activating once, you will not be required to do so again unless you upgrade the product or uninstall and then install it again.
There are some system environment changes that require reactivation as well such as upgrading Windows.
When you run the application for the first time (for example, right after the installation), you will receive an activation prompt. You will need to enter the email address that the license is assigned to and the password you were provided in your purchase email to log in.
Legacy Licenses FAQ
It’s important to understand what the “Lifetime” license distinction is.
When you purchased your version of the software, you were purchasing a lifetime license for that version.
“Lifetime” means that you do not have to pay anymore for that version. It does not qualify you for unlimited updates for the duration of the user’s life.
Software needs to be updated consistently to maintain compatibility with modern operating systems. It is the user’s responsibility to make sure licenses are kept up-to-date.
This, regrettably, is no longer possible.
The license management system we used to generate these keys was discontinued, and we no longer have access to it.
If your license can no longer be activated using the online method, then there is no alternative.
We hope you will consider converting your Legacy Licenses to one of our current plans. Email sales@pdf2xl.com for a quote.
In 2019, we introduced the new PDF2XL Product line, which can be seen on our pricing page: https://www.pdf2xl.com/pricing/
The older software versions–6.5 and earlier–were delegated to “Legacy” status.
Legacy licenses are no longer supported.
You can continue to use Legacy Licenses for as long as they continue to work for you, but we cannot provide help with these versions.